How do I request resources on the cluster with smux?
Overview
Teaching: 0 min
Exercises: 0 minQuestions
What is the difference between login and compute nodes?
How do I request resources on the HPC on the command line?
How do I request resources on the HPC using Strudel2?
Objectives
Submit an interactive job on the command line.
Submit a job submission script to the cluster.
Query the cluster for information about my jobs.
Understand alternative methods to access resources using Strudel2, such as desktops and JupyterLab.
Login and Compute Nodes
You can see the resources on the cluster now,
but we still haven’t shown you how to access them.
When you login to the cluster, you’ll notice the command line
will say something like [m3username@m3-login1 ~].
This is telling where you are, which is on a login node.
When you first login to the cluster,
rather than putting you on a random node with random
resources, you’re directed to a login node.
The other nodes which you have seen by using tools like
sinfo and show_cluster, are referred to as compute nodes.
In general, clusters will have a few login nodes available that everyone will be assigned to when they log on. It is important to know that because the login node is shared between all users who have just logged in, it should be reserved for lightweight tasks like
- Opening and editing files
- Navigating around the system
- Submitting jobs
- Investigating the cluster (
show_cluster,sinfo, etc.) - Tasks which aren’t computationally intensive.
If you run intensive tasks on the login node, it will impact other users negatively, and you may even get a friendly email from the HPC admins asking if you need any help getting onto a compute node. This means that before you can do computationally intensive work like running ResNet, you need to request compute node resources.
When can you use the login node?
Which of the following tasks could be done on the login node?
- Training a neural network
- Downloading a dataset
- Using git to pull a repository
- Editing a script
Solution
- Training a neural network is computationally intensive, and may impact other users - don’t do this on the login nodes.
- Downloading a dataset should also be done on a compute node, or M3 has a special node for large data downloads at
m3-dtn.massive.org.au.- A git pull can generally be done safely on the login node, but if it’s particularly large and takes a long longer than 15 minutes, consider moving to a compute node instead.
- Editing a script is lightweight enough that doing this won’t impact other users. You can do this on the login node.
In general, if you’re not sure if something is too heavy for the login node, request a compute node to run on.
Requesting compute resources on the command line
Here, we assume you have ssh’d into M3 using a terminal, or are running a terminal on the login node with Strudel2. While GUI interfaces exist for accessing HPC, traditionally HPC access is provided via the Linux command line. It’s important to understand how to request resources on the command line, and how to query the HPC about your requests.
You will remember from earlier than the cluster is shared among many users, and so there is a scheduler which manages the queue. Jobs refer to tasks for the HPC which wait in the queue, including resource requests. The way the queue is ordered and the amount of time you will wait in the queue is a complicated topic that we will discuss later, but for now you can think of the queue as a method for the scheduler to manage supply and demand.
In general, there are two ways to request resources on the command line:
-
Interactively: You request access to a compute node where you can type in commands in real time, the same way you would on your local workstation. You may have to wait in the queue to access a compute node interactively.
-
Job submission: You write a list of instructions (commands to execute) and the resources you need for the commands in a job submission script. You then submit your request to the scheduler which will determine when your job begins You may have to wait in the queue for your job to begin, but it will execute automatically when resources are available.
There is an additional way to access compute resources on MASSIVE with the Strudel interface, which we will cover later.
Interactive jobs (srun and smux)
Interactive sessions allow you to connect to a compute node and work on that node directly. This allows you to develop how your jobs might run (i.e. test that commands run as expected before putting them in a script) and do heavy development tasks that cannot be done on the login nodes (i.e. use many cores). Despite being interactive, you may need to queue to gain access to a session. You can find documentation for running interactive jobs on MASSIVE on our docs website.
On a general cluster with a SLURM scheduler, you would use the command
srun to request resources for an interactive job. On MASSIVE, we have a command
called smux, which combines srun with tmux. The command line tool
tmux allows you to reconnect to running sessions, split your terminal
pane so you can do work side by side, and otherwise improve your command
line experience. By combining the two to create smux, you have the ability
to connect and reconnect to interactive sessions as they run - for example,
if your internet drops out while you’re running an interactive job, this allows
you to reconnect rather than requesting a new session.
In general, the command to start a new interactive job on MASSIVE is
smux new-session`

This will request an interactive job with default resources of 1 CPU, 4G of memory, and 2 hours of walltime. This request will be added the queue, and when the resources are available, the job will schedule and you’ll have access to a compute node. When your job starts, you will notice your terminal changes and looks like:
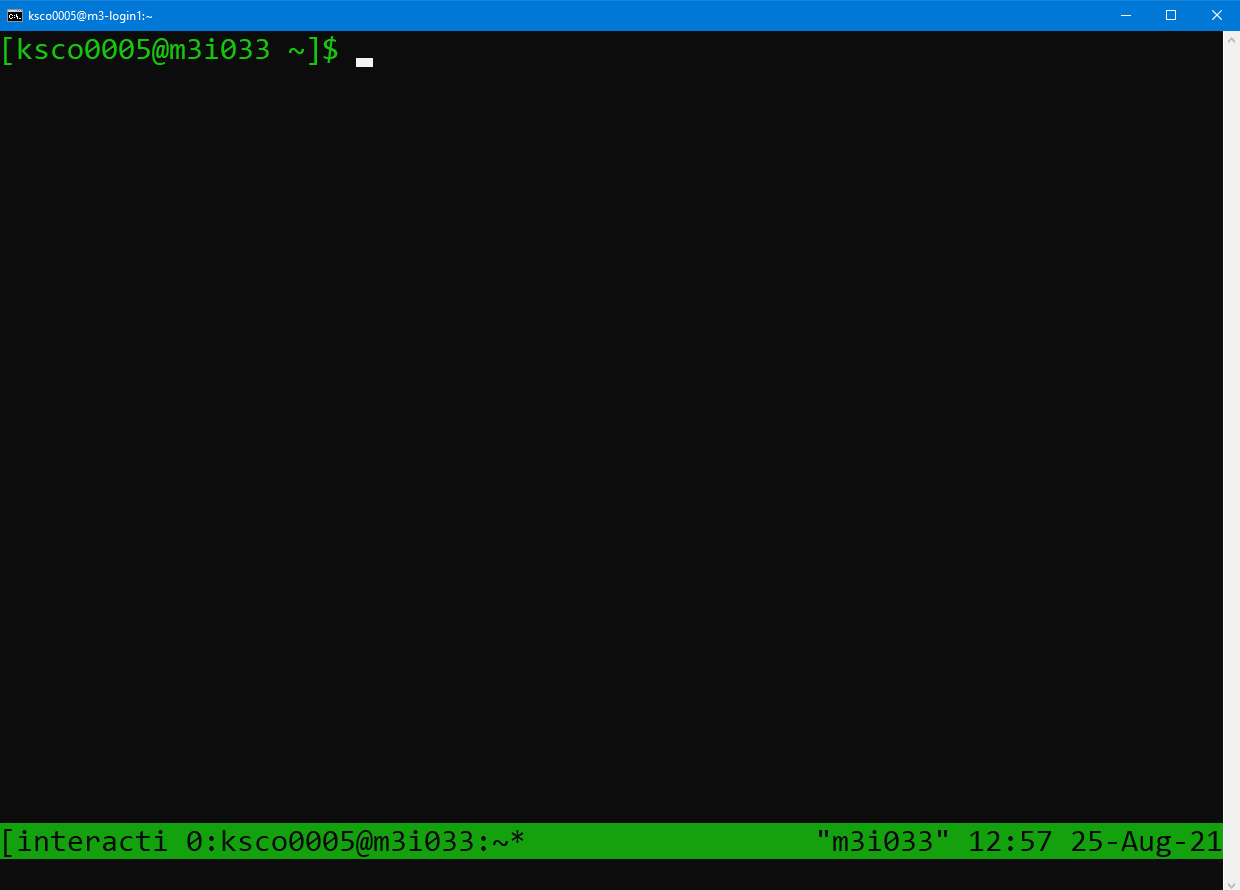
You will notice the command prompt has changed to say username@m3i033,
which indicates which compute node I have attached to. The bar down the
bottom of the screen indicates I am currently running a tmux session
connected to m3i033, as well as the date and time. The name of my job,
“interactive”, also appears in the bottom left hand side.
The power of running smux is that you can disconnect and reconnect to this
session with compute node access while the job is running. To detach from the
session without cancelling my job, type in Ctrl+B, release the keys,
and then press the d key.
To see what sessions I have running, I can use the smux list-sessions command,
and it will output a list of my currently running jobs, as well as any that are
still waiting in the queue.
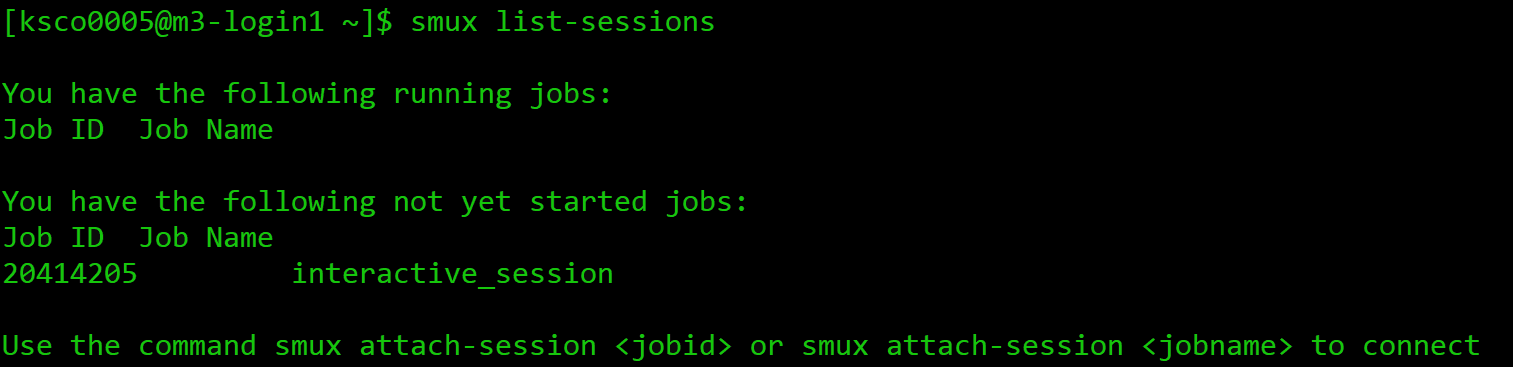
This includes the job name, and the job ID number assigned
by the SLURM scheduler. We will explore the purpose of the job ID number in more depth shortly.
To reconnect to a running session, use the smux attach-session <number> command
which will take us back to our session. Any processes which were running when we left the
session will have continued to run.
If you wish to leave the running session, and cancel it, you can type exit or
use Ctrl+D. If you run smux list-sessions
following this, you’ll see your session is no longer listed, and you will
need to request resources again next time you need them.
There are some parameters you can change in your smux command if you need different resources than the defaults. For example, you can run:
smux new-session --time=03:00:00
This will update the time of your session from 2 hours to 3 hours. You can see the other parameters you’re able to change by running:
smux -n --help

usage: smux new-session [-h] [--ntasks <n>] [--nodes <n>] [--mem <n>]
                        [--cpuspertask <n>] [--qos <n>] [-J <n>] [-A <n>]
                        [-p PARTITION] [-r RESERVATION] [-t TIME] [--gres <n>]
                        [-o <n>] [-e <n>]

optional arguments:
  -h, --help            show this help message and exit
  --ntasks <n>          The number of tasks you will launch
  --nodes <n>           The number of nodes you need
  --mem <n>             The amount of memory you need
  --cpuspertask <n>     The number of cpus needed for each task
  --qos <n>             The QoS (Quality of Service) used for the task
                        (certain QoS are only valid on some partitiotns)  -J <n>, --jobname <n>
                        The name of your job
  -A <n>, --account <n>
                        Specify your account
  -p PARTITION, --partition PARTITION
                        The partition to execute on
  -r RESERVATION, --reservation RESERVATION
                        The reservation to use
  -t TIME, --time TIME  The amount of time to run for
  --gres <n>            The type and number of gpus needed for each task  -o <n>, --output <n>  Standard output file name
  -e <n>, --error <n>   Error output file name
As you can see, you’re able to change a variety of paramaters for your resource request, inclusing ntasks (number of CPUs), mem (amount of RAM), or partition (for specific partitions with certain resources available).
Getting started with smux
Start an smux session with 1 hour walltime and 4 CPUs on the
comppartition.Hint: running
smux n --helpmay help if you get stuck.Solution
You would run the command:
smux new-session --time=01:00:00 --ntasks=4 --partition=compRemember, time assigns time in the format DD-HH:MM:SS, ntasks refers to the number of cpus, and partition tells the scheduler which partition to submit the job to.
If you only ask for a small amount of available resources like the default
smux new-session command does, you’ll likely only wait a few seconds for your
session to begin. However, if you ask for more resources, you may need
to wait for your job to start before you can connect.
Every time you request resources on the HPC you create a job that waits
in the queue, and that job has an associated job ID as we saw earlier.
SLURM has a variety of tools for interacting with jobs you have submitted,
and jobs that you’re running. These tools will work with other methods
for requesting resources such as job submission with sbatch, and jobs
submitted with other tools such as Strudel Desktops. Let’s explore these
tools with an interactive smux job.
For example, consider the following command:
smux new-session --ntasks=4 --mem=4G --time=24:00:00 --gres=gpu:2
The --gres=gpu:2 portion of the command specifies that we need two GPUs.
GPUs are specialised resources that are in high demand, and we are requesting
two - this will make it more difficult for the scheduler to find available
resources. This is an example of an interactive job that won’t start immediately,
and our job will wait in the queue for a while.

Here, we can use the smux list-sessions command again to see what’s
going with our interactive job. Other SLURM tools we can use to investigate
our job include:
# To see every job waiting in the queue
squeue
# To investigate specific jobs waiting in the queue
squeue -j <job-id>
# To investigate all jobs a user has the queue
squeue -u <username>
# To find the predicted start time of a job
# Usually combined with the -j or -u options
squeue --start
# A tool built for MASSIVE to list details of jobs running or in the queue
show_job
# To cancel a submitted or running job
scancel
You can find your job ID by running smux list-sessions, and then try the above commands
on your waiting job. The final scancel command will cancel the job.
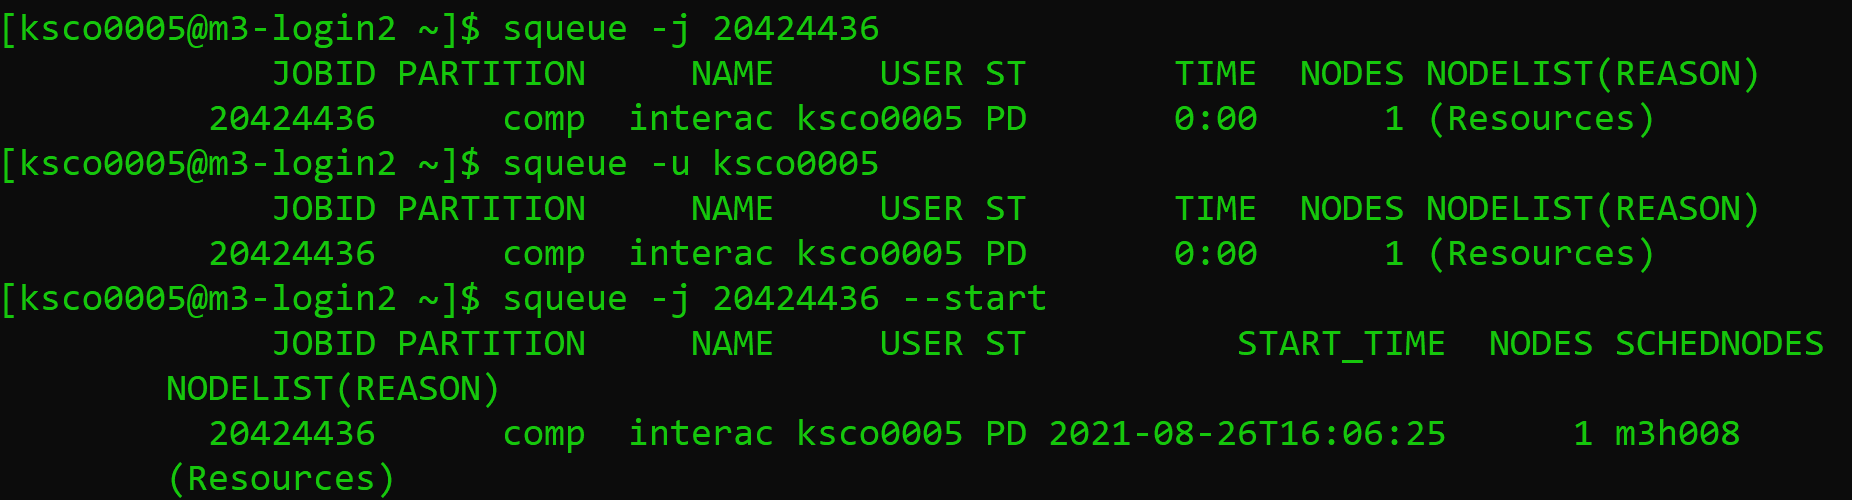
The squeue command will output information about your job, including the Job ID,
the partition the job is submitted to, the name of the job, the user
running the job, the state it’s in, how long it has been running, how many nodes
you have requested, and why the job hasn’t started yet. Im particular, a state of
PD means pending, and the job submitted above is waiting due to Resources.
This reflects our request for two GPUs which currently aren’t available. You can also
see the --start option has predicted my job start time as 4pm on the 26th of August.
The output of the show_job command is quite lengthy, so I recommend you run this
in your own terminal.
Job profiling with interactive jobs
One of the reasons to use interactive jobs is to see what resources you will need before moving to job submission. One way to measure the the resources used by a job is with the
sacctcommand, which we will explore.For this exercise, you should:
- Reconnect to your smux session from before if you disconnected, or start another job.
- Time how long it takes to run the following bash script: ./thiscourse/bashscript.sh
- Once you’ve recorded the time somewhere, cancel your smux interactive job.
- Try typing in the command
sacct -j <job-id> --format=JobID,Jobname,partition,state,time,start,end,elapsed,MaxRss,MaxVMSize,nnodes,ncpus,nodelist`What do you think the output is useful for?
Solution
- To reconnect, you’ll use
smux attach-session <job-id>If you’ve lost your job ID, you can find it by runningsmux list-sessions, orsqueue -u <username>. and if you already deleted your session, you can start a new one.- You will run the command
time ./bash.bashIt should take around [blah].- You can cancel your smux session by typing
exit, or by running scancel. - The
sacctcommand, called s-account, can give you information about the jobs you have run, similar toshow_job. It’s a useful tool for profiling the resources your job has used, with many options to select from including the ones shown here. You can learn more in the SLURM documentation.
Congratulations - you can now ask for HPC resources interactively! Note,
if you’re using a different HPC than MASSIVE you won’t have smux, and will use
srun instead. The commands look very similar. For example:
srun --time=01:00:00 --ntasks=4 --partition=comp
You won’t be able to disconnect and reconnect from the session as it runs.
You can always learn more about srun if needed by going to the
SLURM documentation website.
Job submission scripts (sbatch)
To get access to the largest amount of compute time you need to submit non-interactive jobs. You might want to submit a job when:
-
You need a large amount of compute resources. As we have seen, when you request more resources or resources in high demand, you have to wait in the queue. A job is no longer very interactive if you have to wait hours for it to start!
-
You have tested your code and know what resources you need, and want to write a job submission script for reproducibility.
-
You have tested your code and have the commands well defined now. There’s no point waiting around at your computer to type in commands when a job submission script will execute them for you when resources are available.
Overall, the benefit of submitting jobs versus running interactive jobs is that when the resources become available to you, the job will execute the commands you wrote immediately. If you have an interactive job, commands are only executed when you input them, leading to wasted time on your behalf waiting for the session to become available and wasted resources (compute time) that could be used by others in their research. It is important to use interactive jobs as the precursor to job submissions to get the benefits of both.
Let’s have a look at a basic sbatch script - you’ll notice some of the commands look very similar to what you needed to run for your interactive smux job.
\#!/bin/bash
\#SBATCH --job-name=MyJob
\#SBATCH --mail-user=youremail@domain.com
\#SBATCH --mail-type=BEGIN,END,FAIL
\#SBATCH --account=nq46
\#SBATCH --time=01:00:00
\#SBATCH --ntasks=1
\#SBATCH --gres=gpu:2
\#SBATCH --partition=m3g
\#SBATCH --mem=4G

./mycode.sh
Getting started with sbatch
Using the knowledge you already have, take a guess at what each #SBATCH command in the example script does.
Solution
Some of these you will know from our interactive examples before!
--job-name=MyJobgives your job a name, and isn’t necessary to get your job running.--mail-user=youremail@domain.comandmail-type=BEGIN,END,FAILindicates to SLURM you want to be emailed when your job begins, ends, or fails. This isn’t necessary to get your job running.--account=nq46indicates what your project ID is.--time=01:00:00indicates the walltime of your job, 1 hour in this case.--ntasks=1indicates the amount of CPUs you need, 1 in this case.--gres=gpu:2indicates the amount of GPUs you need, 2 in this case.--partition=m3gindicates the partition with the resources you need. In this case I know I want V100 GPUs, so I request the m3g partition.--mem=4Gindicates the amount of memory you need, 4G in this case../mycode.shis the actual code you want to run! Anything you would usually run on the command line goes here.
To run this script on the command line, you would type in:
sbatch myjob.sh
Once you do this, the scheduler adds your job to the queue, and waits for the resources you’ve requested to become available. Once they are available, the script will run. You can use the same SLURM commands we learned earlier to investigate the status of your job while it waits in the queue and is running.
When your job is running, SLURM will also produce two output files, typically called
Submitting a job to the cluster
In the exercises “Getting started with smux” and “Job profiling with interactive jobs” you started an interactive job and ran a piece of bash code. Run that job again, except this time to submit it to the cluster with a job submission script. You will need to create a script to do this using #SBATCH directives instead of smux, and submit it to the cluster with the sbatch command. Remember the time you noted down earlier for running the script! Don’t worry if this takes a few attempts to get right! Remember, you can use the
squeueandshow_jobcommands to see if your job is running. You can also see how your job is running by checking the SLURM output files. Once the job is done, you can investigate the resources used using thesacctcommand.Solution
smux new-session –time=01:00:00 –ntasks=4 –partition=comp The job submission script you create might look like:
#!/bin/bash
#SBATCH --time=00:10:00
#SBATCH --ntasks=4
#SBATCH --partition=comp
#SBATCH --account=<projectid>

./blah
You would then need to use the command,
sbatch myscript.shto submit the job, with whatever name you used to create the script.
Congratulations - you can submit jobs to the cluster! We have covered quite a lot of content in this section, so don’t be alarmed if it takes a while to sink in. It takes a bit of practice to get used to the HPC environment and submitting jobs, both with smux and submission scripts. Remember, if you’re ever unsure, you can always check the SLURM documentation site that’s been linked throughout this lesson, or send an email to help@massive.org.au.
Key Points
The login node should only be used for lightweight housekeeping tasks.
Interactive jobs are accessed with the smux command on MASSIVE and still need to be queued for.
Interactive jobs are good for prototyping and developing code before submitting jobs.
Job submission scripts are an effective and reproducible way to undertake research on the cluster.
You can also access MASSIVE resources with desktops and JupyterLab sessions using Strudel2.
You can interact with running jobs using
squeue,scancel, andshow_job.