What is a cluster?
Overview
Teaching: 0 min
Exercises: 0 minQuestions
What is a High Performance Computer (HPC)?
What are the components of a HPC?
What is a scheduler, and why do we need one?
Objectives
Explain what a HPC is at a high level.
Explain what a node and scheduler are in a HPC.
Determine whether or not HPC is the right tool for your research.
What is a HPC?
The acronym HPC refers to a High Performance Computer - but what does that really mean? We will spend a little bit of time introducing some core language.
- Local workstation in this course will refer to the computer in front of you, whether that’s a desktop, laptop, tablet, or other device.
- Supercomputer refers to one particular type of high performance computer, which is composed of advanced processors. There was a time in computing when vector processing was being developed, making these processors much faster than their predecessors. CRAY-1 was the first supercomputer implementing these processors. This meant they could take a single task and complete it much faster than the average computer.
- Cluster also refers to a type of high performance computer. Over time, advanced processors have become available to all computers, so modern HPCs tend to be clusters rather than supercomputers. This means they’re composed of many smaller computers rather than advanced computers. They are powerful for solving problems that can be split into parts and distributed across the many computers that make up the cluster.
The HPC we assume you have access to in this course, MASSIVE M3, is a cluster. What this means in practice, is that not all problems are solved faster simply by running them on a HPC cluster - you have to think about how to adapt your problem. Don’t worry if you’re not sure what that looks like yet.
What are the components of a cluster?
Nodes
As explained above, a cluster is a collection of “computers”. A single computer or group of resources in a cluster is referred to as a node. For example, your local laptop might have 4 CPUs, 16GB of RAM, and no GPUs. We can imagine my laptop had identical resources. If we could somehow connect our laptops into one cluster, we could think of each individual laptop as a node.
Partitions
A group of nodes that have the same resources on them, and which can be accessed by the same group of people, is referred to as a partition. Both of our laptops have the same compute resources, and can be accessed by both of us, so they would make up a partition. We can give this partition a name, “no GPU laptops.” If a third person had a laptop with 16 CPUs, 4 GPUs, and 64GB of RAM, their laptop would be a new node, but it would belong to a different partition. We could call this “4 GPU laptops.”
Why do we need partitions?
Can you think of any reasons it might be helpful to have partitions in a cluster? Remember, a partition is just a group of nodes that share some properties.
Solution
Organising the cluster with partitions makes it possible to request particular resources based on partition. It also makes it possible to set certain rules for each partition - for example, you might want a partition that only allows code that runs for half an hour on it. Grouping those nodes into one partition makes it easier to organise the cluster for different purposes.
Shared filesystem
If I tried to connect our laptops like in our previous example it would be difficult for both of us to use them. On my laptop I would only have access to my files, and on your laptop you would only have access to your files. On a HPC however, we have a shared filesystem, meaning each node, regardless of partition, has access to the same files.
Sharing is caring on a HPC
Perhaps the idea of just connecting our laptops together has already gotten you asking questions about the challenges of a shared computing system. However, there are some good motivations for using a shared HPC, and some tools designed to make sharing much easier than it would be if we just connected out computers together.
One motivation for using a HPC is that shared hardware also means a shared pool of money for buying that hardware. Computers are expensive - if I only need a GPU sometimes, or only need large amounts of storage occassionally, it makes sense to split the cost of those resources across a group of people, and share the among them too.
Of course, when sharing a resource among many people, it’s important to make sure everyone gets fair access to those resources. For this reason, when using a HPC you will request access to the resources you need, and then a scheduler will decide who gets to use the resources next. This ensures if we all want to use the same resources at the same time, there’s a way to decide who gets to use it first, as the scheduler will create a queue. You can think of the scheduler playing a game of Tetris, where it’s trying to fit all the resource requests together in the best way possible. On M3, our scheduler is called SLURM.
How do we make scheduling fair?
Imagine you are the scheduler for a HPC and you have to decide how to order the resource requests. What things will help you make your decision? How can you make access to the resources fair?
Solution
There are lots of answers to this question. One thing to consider might be if everyone paid the same amount for the hardware. Another might be to make sure everyone gets access to the same amount of time using the HPC. Another thing to consider is the type of hardware being requested - if someone asks for 200GB RAM, is it worth the same as someone asking for 20GB RAM, or 500 GB of RAM? It’s hard work being a scheduler!
Key Points
Most HPCs are not supercomputers, but clusters composed of many computers.
Each computer in the HPC is a group of resources, called a node. Nodes with the same flavour of resources and access requirements are called partitions.
A HPC is shared with other people, so it has a scheduler to ensure everyone has fair access.
Why should I use a HPC?
Overview
Teaching: 0 min
Exercises: 0 minQuestions
What does a cluster have that my local workstation doesn’t?
What problems are clusters good at solving?
What machine learning specific problems can a cluster help me solve?
Objectives
Outline resources available on a cluster compared to your existing local workstation.
Identify if your research problems are suited to the HPC environment.
Describe problems within machine learning that are suitable for the HPC environment.
So, why would I use a HPC?
Remember, not all problems are solved faster by using a cluster. If all I do is move my code from my local workstation onto the HPC, I may see no improvement - you have to spend some time thinking about the benefits of migrating to the HPC environment.
Some reasons you might use a HPC, particularly for machine learning, are:
- The HPC has resources that you don’t have - for example, your personal workstation might not have any GPUs for your GPU enabled code.
- The HPC has better versions of resources you do have, like GPUs with more RAM available, enabling you to use bigger batch sizes.
- The HPC has more storage available than your local workstation, enabling you to work on bigger datasets.
- You have code that runs for a very long time, and want to outsource that work off of your local workstation.
- You have code which can be scaled across multiple CPUs or GPUs, and want to take advantage of the cluster to scale your code.
Usually, someone moves to the HPC when they realise they’re being limited by their existing resources.
Research restriction
Can you think of a time when your research was limited by your computing resources, or when something was more difficult than it needed to be?
Answers
There are many good answers to this question - maybe your code was too slow or you couldn’t download a whole dataset. Write your problem down and at the end of this course, see if you can solve it.
What problems are HPCs good at solving?
- A HPC can’t do sequential problems extra fast. For example, when you get ready in the morning, you can’t brush your teeth and eat breakfast at the same time, they must be done in order.
- A HPC can distribute your work if you can break it into independant parts which don’t depend on or conflict with eachother. For example, you can boil a kettle and toast bread at the same time. at the same time.
- Long story short - if your problem can be broken into independant parts, a HPC may help accelerate your work. Sometimes this takes some thinking and work to achieve.
Matrix Multiplication with Friends
A concrete example of a problem which can be decomposed into parts is matrix multiplication.
If we were to multiply two 2x2 matrices by hand, it would look like:
[[a,b] [[e,f], = [[ae+bg, af+bh],
[c,d]] [g,h]] [ce+dg, cf+dh]]
Let’s suppose that every multiplication takes 1 second, and every addition takes 1 second. Each of the four components of our new matrix, (i.e. ae+bg) is comprised of two multiplications, and 1 addition, meaning it takes each component 3 seconds to calculate. If we do this alone, it would take us 12 seconds to calculate the resulting matrix.
However, there are a few ways we could share this problem with friends. We know each component takes two multiplications and one addition, but the multiplications can be done independantly. We can do the multiplications simultaneouslt if there are two people working, calculating each matrix component in two seconds, and the entire matrix in 8 seconds.
We can also see each component of the matrix can be worked out independantly - if we had 8 people working on the matrix at once, two per individual component, we could calculate the result in just 2 seconds. By decomposing our work into independant pieces and doing them simultaneously, we can reduce computation time from 12 seconds to only 2!
Parallel Problems
Can you think of any other problems, in mathematics, or your day to day life, that can be parallelised if you have more people to work on them?
What ML problems is a HPC suitable for?
Access to a HPC is useful for a variety of machine learning problems. Some examples of where a HPC excels in machine learning include:
- In deep learning specifically, there is a lot of matrix multiplication which GPU architecture is designed to do quickly. Some HPCs provide more advanced GPUs designed for computation rather than graphics, which are especially good for this task.
- When developing a machine learning model, there is a need to test out hyperparamaters. This often means running the same model multiple times with different hyperparameters, or doing a grid search to determine those ideal hyperparameters. These tests can be performed independantly of eachother, but your local workstation may be limited by the number of processors it has - you can access more resources on a HPC.
- Similarly, when evaluting the performance of a model, you may use techniques like cross-validation, which require repeated independant runs of the same code. Having more processors to distribute this workload across is where a HPC comes in handy.
Key Points
HPCs offer increased resource size across storage, RAM, the number of CPUs, the number and type of GPUs, as well as the ability to perform parallel computing.
A HPC may assist you in speeding up your research, but it’s important to spend some time identifying where it can assist your research problem, or modifying the problem to suit the HPC environment.
Deep learning in particular lends itself to the HPC environment, and can accelerate your training.
How do I login to a cluster?
Overview
Teaching: min
Exercises: minQuestions
How do I log into the cluster?
Are there other methods to log in than the command line?
How do I choose which method to log in?
Objectives
Log in to MASSIVE M3.
Understand login methods available to you.
Traditional methods: the command line interface
Traditionally, you log into a cluster on the command line, and access the cluster
on the command line as well. Most clusters operate with a Linux operating system
(rather than Windows or Mac)..
As the cluster is a remote resource and not right in front of you, to log in
you will need to secure shell, or ssh in.
Whether your local workstation is a Windows, Mac, or Unix based operating system may impact how you login to the cluster and access the command line interface, but we will outline instructions for all options here.
Windows 10
If you’re using Windows 10, you should be able to ssh into the cluster using
the command prompt.
- Type
cmdinto the search bar, and open the command prompt. - In the command prompt, type
ssh username@m3.massive.org.au, replacingusernamewith your M3 username. Your username will have been sent to you in a welcome email, or you can find it in the HPC ID portal. - You will be prompted for a password. When you type it in, nothing will appear on the screen - this is normal behaviour!
- Once you have logged in, you will see the message of the day, and the command
prompt should show
[m3username@login1 ~]or similar.
Troubleshooting
- If it’s the first time you’re logging in, you will get a message asking if you’re willing to accept the cluster’s public key. This is one way to confirm you’re logging in to the computer that you think you are, so you don’t unintentionally send your password somewhere else.
- If you type your password wrong multiple times, you may be locked out of the system and recieve a message saying “Connection reset by peer”. In this case, wait 10 minutes and try again, or if you’ve forgotten your password, reset it in the HPC ID portal.
- If the command prompt doesn’t recognise the
sshcommand, use one of theOther Methodslisted here.
Mac and Linux
- Open a terminal.
- In the terminal, type
ssh username@m3.massive.org.au, replacingusernamewith your M3 username. Your username will have been sent to you in a welcome email, or you can find it in the HPC ID portal. - You will be prompted for a password. When you type it in, nothing will appear on the screen - this is normal behaviour!
- Once you have logged in, you will see the message of the day, and the command
prompt should show
[m3username@login1 ~]or similar.
Troubleshooting
- If it’s the first time you’re logging in, you will get a message asking if you’re willing to accept the cluster’s public key. This is one way to confirm you’re logging in to the computer that you think you are, so you don’t unintentionally send your password somewhere else.
- If you type your password wrong multiple times, you may be locked out of the system and recieve a message saying “Connection reset by peer”. In this case, wait 10 minutes and try again, or if you’ve forgotten your password, reset it in the HPC ID portal.
Other
Methods
Some older Windows computers or some especially fussy computers may have
trouble using the inbuilt command line to ssh into M3. There are other tools available
to help you do this, including:
- PuTTy
- Cygwin
- WinSCP
- The Windows Subsystem for Linux
We’ll show you the steps for PuTTY here as it’s the most beginner friendly, but
feel free to try a more advanced option if you’re comfortable with ssh.
EXERCISE Using one of the methods above, ssh into M3.
You have successfully logged in! You will notice that you logged into the cluster with a password, but it’s more secure to log in using keys - keys also save you from typing in your password every time you access the cluster! There are some instructions for setting up an ssh key on docs.massive.org.au here:
Less traditional methods to access the cluster
On MASSIVE M3, we offer some other methods to access the cluster beyond the command line.
This includes a desktop interface, JupyterLab, and even a terminal which can be logged into
with your AAF login rather than an ssh command.
The benefit of these alternative interfaces is they’re often more user friendly than the command line, and it enables you to run visual software on the cluster. M3 isn’t the only cluster that provides access to the cluster via things like desktops - here, we use a tool called Strudel.
EXERCISE: LOGIN TO STRUDEL, EXPLORE
Key Points
What resources are available on the cluster?
Overview
Teaching: 0 min
Exercises: 0 minQuestions
What resources can I request on a cluster?
How do I find out which resources are available on the cluster I’m using?
Objectives
Use the command line to determine the resources available on the cluster.
Use other tools and resources to determine the resources available on the cluster.
So far, you’ve learned
- What a cluster is
- Why you might want to use one
- How to log into one.
I’ve told you that there are different resources on a HPC than in your local workstation, and in this section I’ll show you how to find out what’s available to you.
What resources are available in general?
There are a variety of computational resources you may be aware of. These include:
- CPUs (Central Processing Units). These are designed for sequential processing.
- GPUs (Graphical Processing Units). These are traditionally designed for displaying graphics. Graphics are represented with matrices, meaning GPU architecture is excellent at performing matrix multiplications. Some HPC clusters will have access to “data center” GPUs, especially designed for computation rather than graphics. These will differ from what’s typically available to your local workstation.
- TPUs (Tensor Processing Units). These processors have been especially designed for working with tensors and neural networks, which you may be familiar with from TensorFlow or PyTorch. Notably, Google Colab provides access to TPUs, with an introductory tutorial notebook.
- Time. When using a HPC you will need to specify how long you want to use the shared resources for.
- RAM (Random Access Memory). You will need to consider how much memory is required to run your code.
- Software. Every computer will come with its own unique set of installed software - the HPC is included. We’ll talk more about specific software later.
Local resources
Take a moment to think about what resources are available on your local workstation. How many CPUs? Do you have a GPU? Any specialised software?
How do I know what’s available on MASSIVE?
There are a variety of methods to discover which resources are available to you on a given cluster. Most HPC sites will offer a documentation website - for MASSIVE, you can find our documentation on docs.massive.org.au. In particular, you can find out more about our hardware on the About M3 page, or about our GPUs specifically in our section on GPUs.
We also provide some of this documentation in the Strudel2 interface. Under the Account Info tab, you are able to see a list of desktop types that are available, and under the Desktops tab, you will be able to learn more about the specific resources assigned to each desktop type.
Another method to find out information about the resources on the cluster is using the command line. You will remember from “What is a cluster?” that we group nodes with the same resources into partitions. Each of these nodes will have a particular set of resources like CPUs and RAM associated with it. There are a few ways to learn more about these partitions and nodes on the command line that we’ll explore here. Most of these commands are associated with SLURM, the scheduler for our HPC.
What partitions are available?
sinfo -s: sinfo is a SLURM command that gives you information about nodes and partitions. This particular command summarises the partitions, where the-sflag indicates summary. It will output a list of each partition, whether it’s available at the moment (and not down for maintenance, for example), the time limits or wall time for using that partition, how many nodes are allocated, idle, out, and total, and which nodes belong to the partition.scontrol show partitions: scontrol is a SLURM command for configuring SLURM, and this command gives you a more in depth view over the partitions available and how they have been configured. There may be information in this ouput which you don’t understand - this is okay, for our purposes it’s another way of seeing which partitions are on MASSIVE. You can also usescontrol show partition <partition-name>to investigate specific partitions.What nodes are available?
sinfo --partition=<partition-name> -N --format=%10N%10c%10m%20f%10G: This sinfo command gives more details about the nodes on a partition. It will print out a list of node names, the number of CPUs, the memory on the node, and any other features such as GPUs.show_cluster: show_cluster is a command developed for MASSIVE which presents a formatted summary of the status of nodes on M3. For a similar output on other clusters, you can usesinfo -lN.
Investigating the Cluster
- Try typing in the commands above and inspect their output.
- What type of GPUs are there on the m3g partition? How did you find out?
Solution
- There are a variety of formats with different information available to you for learning about the cluster!
- There are V100 GPUs on the m3g partition. You could have learned this by running:
sinfo --partition=m3g -N --format=%10N%10c%10m%20f%10Gshow_clustersinfo -lN- Checking docs.massive.org.au for more information
As you can see, there are many ways to learn about the cluster!
Key Points
Different clusters will have different resources available on them.
You can check resources on the cluster with the command line, or by using documentation.
How do I request resources on the cluster with smux?
Overview
Teaching: 0 min
Exercises: 0 minQuestions
What is the difference between login and compute nodes?
How do I request resources on the HPC on the command line?
How do I request resources on the HPC using Strudel2?
Objectives
Submit an interactive job on the command line.
Submit a job submission script to the cluster.
Query the cluster for information about my jobs.
Understand alternative methods to access resources using Strudel2, such as desktops and JupyterLab.
Login and Compute Nodes
You can see the resources on the cluster now,
but we still haven’t shown you how to access them.
When you login to the cluster, you’ll notice the command line
will say something like [m3username@m3-login1 ~].
This is telling where you are, which is on a login node.
When you first login to the cluster,
rather than putting you on a random node with random
resources, you’re directed to a login node.
The other nodes which you have seen by using tools like
sinfo and show_cluster, are referred to as compute nodes.
In general, clusters will have a few login nodes available that everyone will be assigned to when they log on. It is important to know that because the login node is shared between all users who have just logged in, it should be reserved for lightweight tasks like
- Opening and editing files
- Navigating around the system
- Submitting jobs
- Investigating the cluster (
show_cluster,sinfo, etc.) - Tasks which aren’t computationally intensive.
If you run intensive tasks on the login node, it will impact other users negatively, and you may even get a friendly email from the HPC admins asking if you need any help getting onto a compute node. This means that before you can do computationally intensive work like running ResNet, you need to request compute node resources.
When can you use the login node?
Which of the following tasks could be done on the login node?
- Training a neural network
- Downloading a dataset
- Using git to pull a repository
- Editing a script
Solution
- Training a neural network is computationally intensive, and may impact other users - don’t do this on the login nodes.
- Downloading a dataset should also be done on a compute node, or M3 has a special node for large data downloads at
m3-dtn.massive.org.au.- A git pull can generally be done safely on the login node, but if it’s particularly large and takes a long longer than 15 minutes, consider moving to a compute node instead.
- Editing a script is lightweight enough that doing this won’t impact other users. You can do this on the login node.
In general, if you’re not sure if something is too heavy for the login node, request a compute node to run on.
Requesting compute resources on the command line
Here, we assume you have ssh’d into M3 using a terminal, or are running a terminal on the login node with Strudel2. While GUI interfaces exist for accessing HPC, traditionally HPC access is provided via the Linux command line. It’s important to understand how to request resources on the command line, and how to query the HPC about your requests.
You will remember from earlier than the cluster is shared among many users, and so there is a scheduler which manages the queue. Jobs refer to tasks for the HPC which wait in the queue, including resource requests. The way the queue is ordered and the amount of time you will wait in the queue is a complicated topic that we will discuss later, but for now you can think of the queue as a method for the scheduler to manage supply and demand.
In general, there are two ways to request resources on the command line:
-
Interactively: You request access to a compute node where you can type in commands in real time, the same way you would on your local workstation. You may have to wait in the queue to access a compute node interactively.
-
Job submission: You write a list of instructions (commands to execute) and the resources you need for the commands in a job submission script. You then submit your request to the scheduler which will determine when your job begins You may have to wait in the queue for your job to begin, but it will execute automatically when resources are available.
There is an additional way to access compute resources on MASSIVE with the Strudel interface, which we will cover later.
Interactive jobs (srun and smux)
Interactive sessions allow you to connect to a compute node and work on that node directly. This allows you to develop how your jobs might run (i.e. test that commands run as expected before putting them in a script) and do heavy development tasks that cannot be done on the login nodes (i.e. use many cores). Despite being interactive, you may need to queue to gain access to a session. You can find documentation for running interactive jobs on MASSIVE on our docs website.
On a general cluster with a SLURM scheduler, you would use the command
srun to request resources for an interactive job. On MASSIVE, we have a command
called smux, which combines srun with tmux. The command line tool
tmux allows you to reconnect to running sessions, split your terminal
pane so you can do work side by side, and otherwise improve your command
line experience. By combining the two to create smux, you have the ability
to connect and reconnect to interactive sessions as they run - for example,
if your internet drops out while you’re running an interactive job, this allows
you to reconnect rather than requesting a new session.
In general, the command to start a new interactive job on MASSIVE is
smux new-session`

This will request an interactive job with default resources of 1 CPU, 4G of memory, and 2 hours of walltime. This request will be added the queue, and when the resources are available, the job will schedule and you’ll have access to a compute node. When your job starts, you will notice your terminal changes and looks like:
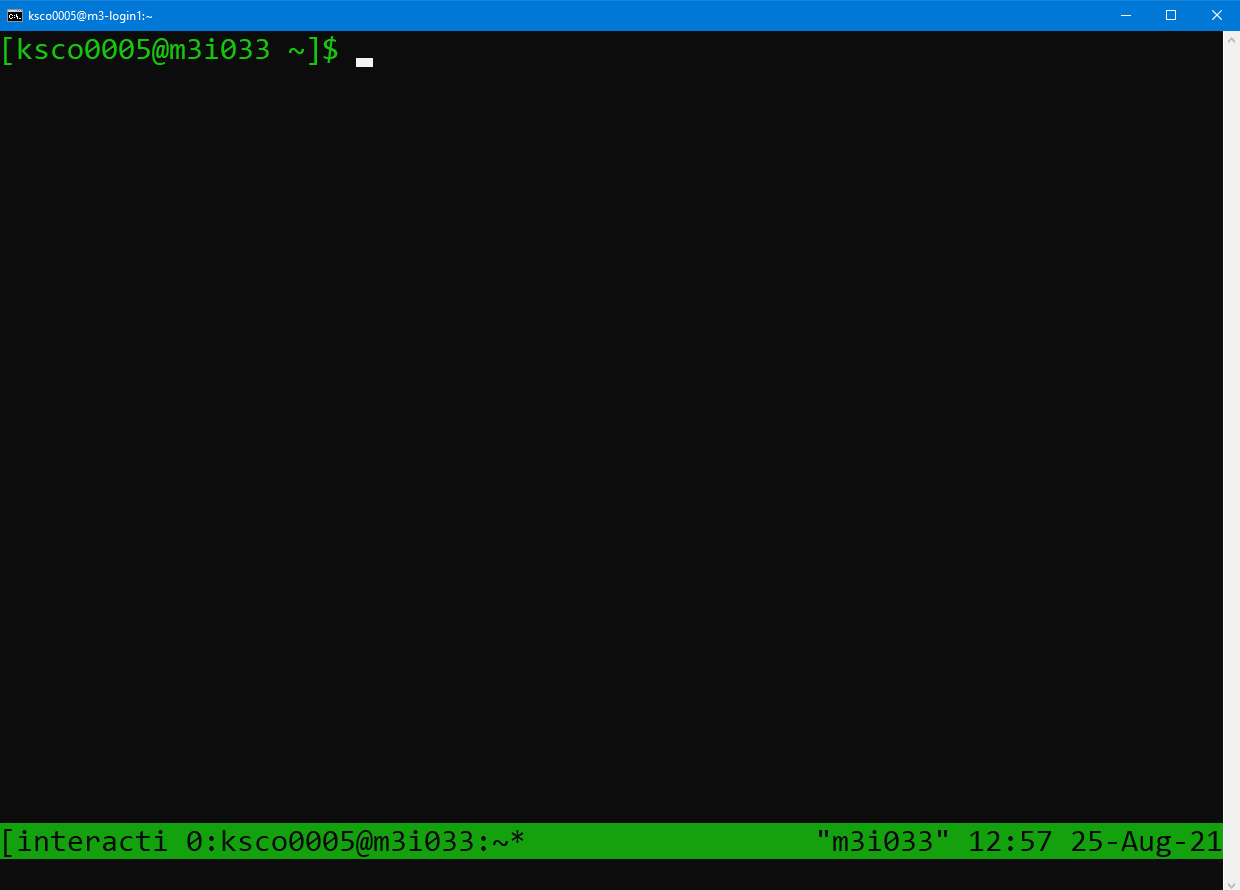
You will notice the command prompt has changed to say username@m3i033,
which indicates which compute node I have attached to. The bar down the
bottom of the screen indicates I am currently running a tmux session
connected to m3i033, as well as the date and time. The name of my job,
“interactive”, also appears in the bottom left hand side.
The power of running smux is that you can disconnect and reconnect to this
session with compute node access while the job is running. To detach from the
session without cancelling my job, type in Ctrl+B, release the keys,
and then press the d key.
To see what sessions I have running, I can use the smux list-sessions command,
and it will output a list of my currently running jobs, as well as any that are
still waiting in the queue.
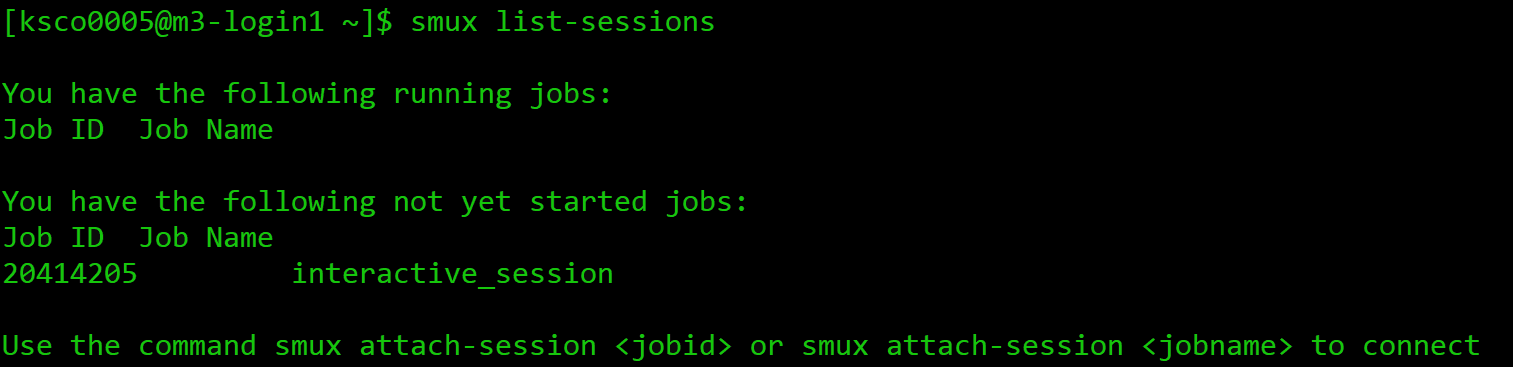
This includes the job name, and the job ID number assigned
by the SLURM scheduler. We will explore the purpose of the job ID number in more depth shortly.
To reconnect to a running session, use the smux attach-session <number> command
which will take us back to our session. Any processes which were running when we left the
session will have continued to run.
If you wish to leave the running session, and cancel it, you can type exit or
use Ctrl+D. If you run smux list-sessions
following this, you’ll see your session is no longer listed, and you will
need to request resources again next time you need them.
There are some parameters you can change in your smux command if you need different resources than the defaults. For example, you can run:
smux new-session --time=03:00:00
This will update the time of your session from 2 hours to 3 hours. You can see the other parameters you’re able to change by running:
smux -n --help

usage: smux new-session [-h] [--ntasks <n>] [--nodes <n>] [--mem <n>]
                        [--cpuspertask <n>] [--qos <n>] [-J <n>] [-A <n>]
                        [-p PARTITION] [-r RESERVATION] [-t TIME] [--gres <n>]
                        [-o <n>] [-e <n>]

optional arguments:
  -h, --help            show this help message and exit
  --ntasks <n>          The number of tasks you will launch
  --nodes <n>           The number of nodes you need
  --mem <n>             The amount of memory you need
  --cpuspertask <n>     The number of cpus needed for each task
  --qos <n>             The QoS (Quality of Service) used for the task
                        (certain QoS are only valid on some partitiotns)  -J <n>, --jobname <n>
                        The name of your job
  -A <n>, --account <n>
                        Specify your account
  -p PARTITION, --partition PARTITION
                        The partition to execute on
  -r RESERVATION, --reservation RESERVATION
                        The reservation to use
  -t TIME, --time TIME  The amount of time to run for
  --gres <n>            The type and number of gpus needed for each task  -o <n>, --output <n>  Standard output file name
  -e <n>, --error <n>   Error output file name
As you can see, you’re able to change a variety of paramaters for your resource request, inclusing ntasks (number of CPUs), mem (amount of RAM), or partition (for specific partitions with certain resources available).
Getting started with smux
Start an smux session with 1 hour walltime and 4 CPUs on the
comppartition.Hint: running
smux n --helpmay help if you get stuck.Solution
You would run the command:
smux new-session --time=01:00:00 --ntasks=4 --partition=compRemember, time assigns time in the format DD-HH:MM:SS, ntasks refers to the number of cpus, and partition tells the scheduler which partition to submit the job to.
If you only ask for a small amount of available resources like the default
smux new-session command does, you’ll likely only wait a few seconds for your
session to begin. However, if you ask for more resources, you may need
to wait for your job to start before you can connect.
Every time you request resources on the HPC you create a job that waits
in the queue, and that job has an associated job ID as we saw earlier.
SLURM has a variety of tools for interacting with jobs you have submitted,
and jobs that you’re running. These tools will work with other methods
for requesting resources such as job submission with sbatch, and jobs
submitted with other tools such as Strudel Desktops. Let’s explore these
tools with an interactive smux job.
For example, consider the following command:
smux new-session --ntasks=4 --mem=4G --time=24:00:00 --gres=gpu:2
The --gres=gpu:2 portion of the command specifies that we need two GPUs.
GPUs are specialised resources that are in high demand, and we are requesting
two - this will make it more difficult for the scheduler to find available
resources. This is an example of an interactive job that won’t start immediately,
and our job will wait in the queue for a while.

Here, we can use the smux list-sessions command again to see what’s
going with our interactive job. Other SLURM tools we can use to investigate
our job include:
# To see every job waiting in the queue
squeue
# To investigate specific jobs waiting in the queue
squeue -j <job-id>
# To investigate all jobs a user has the queue
squeue -u <username>
# To find the predicted start time of a job
# Usually combined with the -j or -u options
squeue --start
# A tool built for MASSIVE to list details of jobs running or in the queue
show_job
# To cancel a submitted or running job
scancel
You can find your job ID by running smux list-sessions, and then try the above commands
on your waiting job. The final scancel command will cancel the job.
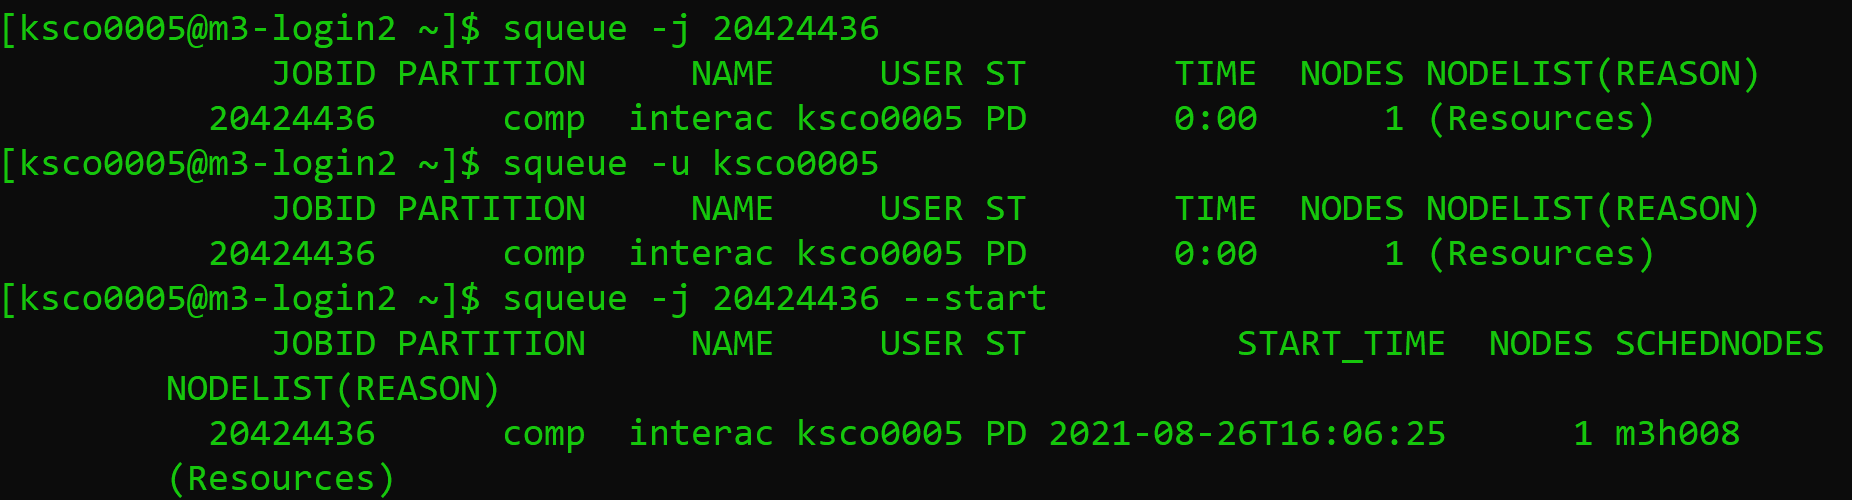
The squeue command will output information about your job, including the Job ID,
the partition the job is submitted to, the name of the job, the user
running the job, the state it’s in, how long it has been running, how many nodes
you have requested, and why the job hasn’t started yet. Im particular, a state of
PD means pending, and the job submitted above is waiting due to Resources.
This reflects our request for two GPUs which currently aren’t available. You can also
see the --start option has predicted my job start time as 4pm on the 26th of August.
The output of the show_job command is quite lengthy, so I recommend you run this
in your own terminal.
Job profiling with interactive jobs
One of the reasons to use interactive jobs is to see what resources you will need before moving to job submission. One way to measure the the resources used by a job is with the
sacctcommand, which we will explore.For this exercise, you should:
- Reconnect to your smux session from before if you disconnected, or start another job.
- Time how long it takes to run the following bash script: ./thiscourse/bashscript.sh
- Once you’ve recorded the time somewhere, cancel your smux interactive job.
- Try typing in the command
sacct -j <job-id> --format=JobID,Jobname,partition,state,time,start,end,elapsed,MaxRss,MaxVMSize,nnodes,ncpus,nodelist`What do you think the output is useful for?
Solution
- To reconnect, you’ll use
smux attach-session <job-id>If you’ve lost your job ID, you can find it by runningsmux list-sessions, orsqueue -u <username>. and if you already deleted your session, you can start a new one.- You will run the command
time ./bash.bashIt should take around [blah].- You can cancel your smux session by typing
exit, or by running scancel. - The
sacctcommand, called s-account, can give you information about the jobs you have run, similar toshow_job. It’s a useful tool for profiling the resources your job has used, with many options to select from including the ones shown here. You can learn more in the SLURM documentation.
Congratulations - you can now ask for HPC resources interactively! Note,
if you’re using a different HPC than MASSIVE you won’t have smux, and will use
srun instead. The commands look very similar. For example:
srun --time=01:00:00 --ntasks=4 --partition=comp
You won’t be able to disconnect and reconnect from the session as it runs.
You can always learn more about srun if needed by going to the
SLURM documentation website.
Job submission scripts (sbatch)
To get access to the largest amount of compute time you need to submit non-interactive jobs. You might want to submit a job when:
-
You need a large amount of compute resources. As we have seen, when you request more resources or resources in high demand, you have to wait in the queue. A job is no longer very interactive if you have to wait hours for it to start!
-
You have tested your code and know what resources you need, and want to write a job submission script for reproducibility.
-
You have tested your code and have the commands well defined now. There’s no point waiting around at your computer to type in commands when a job submission script will execute them for you when resources are available.
Overall, the benefit of submitting jobs versus running interactive jobs is that when the resources become available to you, the job will execute the commands you wrote immediately. If you have an interactive job, commands are only executed when you input them, leading to wasted time on your behalf waiting for the session to become available and wasted resources (compute time) that could be used by others in their research. It is important to use interactive jobs as the precursor to job submissions to get the benefits of both.
Let’s have a look at a basic sbatch script - you’ll notice some of the commands look very similar to what you needed to run for your interactive smux job.
\#!/bin/bash
\#SBATCH --job-name=MyJob
\#SBATCH --mail-user=youremail@domain.com
\#SBATCH --mail-type=BEGIN,END,FAIL
\#SBATCH --account=nq46
\#SBATCH --time=01:00:00
\#SBATCH --ntasks=1
\#SBATCH --gres=gpu:2
\#SBATCH --partition=m3g
\#SBATCH --mem=4G

./mycode.sh
Getting started with sbatch
Using the knowledge you already have, take a guess at what each #SBATCH command in the example script does.
Solution
Some of these you will know from our interactive examples before!
--job-name=MyJobgives your job a name, and isn’t necessary to get your job running.--mail-user=youremail@domain.comandmail-type=BEGIN,END,FAILindicates to SLURM you want to be emailed when your job begins, ends, or fails. This isn’t necessary to get your job running.--account=nq46indicates what your project ID is.--time=01:00:00indicates the walltime of your job, 1 hour in this case.--ntasks=1indicates the amount of CPUs you need, 1 in this case.--gres=gpu:2indicates the amount of GPUs you need, 2 in this case.--partition=m3gindicates the partition with the resources you need. In this case I know I want V100 GPUs, so I request the m3g partition.--mem=4Gindicates the amount of memory you need, 4G in this case../mycode.shis the actual code you want to run! Anything you would usually run on the command line goes here.
To run this script on the command line, you would type in:
sbatch myjob.sh
Once you do this, the scheduler adds your job to the queue, and waits for the resources you’ve requested to become available. Once they are available, the script will run. You can use the same SLURM commands we learned earlier to investigate the status of your job while it waits in the queue and is running.
When your job is running, SLURM will also produce two output files, typically called
Submitting a job to the cluster
In the exercises “Getting started with smux” and “Job profiling with interactive jobs” you started an interactive job and ran a piece of bash code. Run that job again, except this time to submit it to the cluster with a job submission script. You will need to create a script to do this using #SBATCH directives instead of smux, and submit it to the cluster with the sbatch command. Remember the time you noted down earlier for running the script! Don’t worry if this takes a few attempts to get right! Remember, you can use the
squeueandshow_jobcommands to see if your job is running. You can also see how your job is running by checking the SLURM output files. Once the job is done, you can investigate the resources used using thesacctcommand.Solution
smux new-session –time=01:00:00 –ntasks=4 –partition=comp The job submission script you create might look like:
#!/bin/bash
#SBATCH --time=00:10:00
#SBATCH --ntasks=4
#SBATCH --partition=comp
#SBATCH --account=<projectid>

./blah
You would then need to use the command,
sbatch myscript.shto submit the job, with whatever name you used to create the script.
Congratulations - you can submit jobs to the cluster! We have covered quite a lot of content in this section, so don’t be alarmed if it takes a while to sink in. It takes a bit of practice to get used to the HPC environment and submitting jobs, both with smux and submission scripts. Remember, if you’re ever unsure, you can always check the SLURM documentation site that’s been linked throughout this lesson, or send an email to help@massive.org.au.
Key Points
The login node should only be used for lightweight housekeeping tasks.
Interactive jobs are accessed with the smux command on MASSIVE and still need to be queued for.
Interactive jobs are good for prototyping and developing code before submitting jobs.
Job submission scripts are an effective and reproducible way to undertake research on the cluster.
You can also access MASSIVE resources with desktops and JupyterLab sessions using Strudel2.
You can interact with running jobs using
squeue,scancel, andshow_job.
Introduction
Overview
Teaching: 0 min
Exercises: 0 minQuestions
Key question (FIXME)
Objectives
First learning objective. (FIXME)
FIXME
Key Points
First key point. Brief Answer to questions. (FIXME)